sábado, 10 de octubre de 2015

vCAC Deployment: Part II


VMware IaaS Server


Hello Guys,

In this post I'm going to show you how install VMware IaaS Server.

Please take note from these steps:

1.  Install a Windows Server 2012 with the lastest updates from Microsoft.
2.  Install VMware Tools and other tasks that VMware recommends for this server.


In your Windows Server IaaS download this script


https://blogs.vmware.com/PowerCLI/2014/12/vrealize-automation-vra-6-2-pre-req-automation-script-formerly-vcac.html


After that enable MSDTC in your SQL Server Virtual Machine or Physical Machine


Now we start the installer with admin privileges


In  this part check I accept the terms in the license agreement, the click to Next


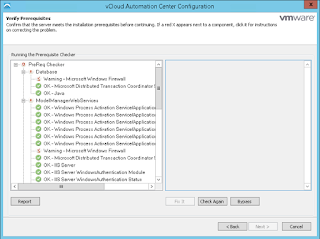
In this part we have to validate the prerrequisites then click to Next (Before this use the script :))


Here fill the vCAC Appliance Information after that click to Next


In this part Select Complete install if You are going to do a Simple Install.


In this part complete the information with user, iaas server and SQL Server Database just click to Next


Just click to Next


In this part validate the information of vCAC Deployment and Click to Next


In this part read the Ready to Install page and the just click to Next


In this part grab a coffee and click to Next.........


In this part click in Finish


Thanks for visiting my Blog!!!

Share and be Sociable!!!


lunes, 28 de septiembre de 2015

VMware User Environment Manager Poster


Hello Guys,

This is the poster from VMware User Environment Manager.
Please take note of the support the New Features here the summary:

The User Environment Manager 8.7 highlight reel for this release includes:
  • Extended Conditions
    • Detect Citrix connections.
    • Detect RDP connections.
  • Improved Horizon View Support
    • Detect PcoIP connections.
    • Detect Blast connections.
    • Support for detecting Client IP and Client Name in Horizon View 6.2 and later.
  • Extended Enterprise Actions
    • Refresh Drive Mappings upon Reconnect/Unlock of a session.
  • Extended Platform Support
    • Windows 10 support.
  • Improved Analysis Tools
    • Provides Extended Analysis in the form of Resultant set of UEM items. Very useful to get an understanding of which UEM items will be applied to a user within a session.
  • Improved Application Onboarding
    • A new feature in the Application Profiler component, Auto exclude sections, provides better Profiling results by providing even better optimized UEM Configuration files for applications.
  • Advanced Physical Support
    • Improved integration in UEM Synctool for dynamically updating the user environment when updates are synchronized locally.
Here a guide: http://kb.vmware.com/selfservice/microsites/search.do?language=en_US&cmd=displayKC&externalId=2118056

And the poster: http://www.vmware.com/files/pdf/techpaper/vmware-end-user-computing-best-practices-poster.pdf

Enjoy!!!

Share and be sociable!!!


VMware Horizon 6 and NVIDIA


Hello Guys,

I share with you an amazing video by VMware End User Computing Blog.

Enjoy!!!


https://blogs.vmware.com/euc/2015/09/bringing-new-meaning-to-mission-critical-powered-by-vmware-horizon-and-nvidia-grid-part-2.html


Share and be sociable!!!

sábado, 12 de septiembre de 2015

vCAC Deployment


vCAC Deployment Part I


In this post We're going to see how to deploy the vcac appliances.  For this deployment we need to download the next appliances:

1.  VMware Identity.
2.  VMware vRealize Automation.

We can go to this link: https://my.vmware.com/web/vmware/info/slug/infrastructure_operations_management/vmware_vrealize_automation/6_2 


VMware Identity

The first step is connect to the VMware vSphere Web Client and then right click to the resource pool where you are going to deploy the VMware Identity Appliance.  Please look the  next picture.


After that just browse the folder where the ova file resides and click to Next


Please read the OVF details and click to Next


Here we need to accept the EULA and the click to Next.


Type the VM name, and select the folder then click to Next.


Select the disk format I recommend Thin Provisioning and then click to Next.


In this part select the Network Adapter the click to Next.


In this part just fill the template requirements such as password, Hostname and Network information. Please look the images below.


In this part don't forget to check the information, and check the Power on after deployment and click to Finish.


Please follow the instructions


In your web browser fill User Name and  Password after that click to Login

In this part check the system information


Here use your time zone for my case is GMT -5


In this part type a password for vsphere.local or SSO administrator click to apply for saving.


Fill with the DNS name for VMware Identity Appliance click to apply.


In this part fill the certificate information you can use a Microsoft CA please look this link if you want to do it http://vdims.blogspot.com.co/2014/05/microsoft-ca.html 


In this part you can complete the Network Information.


In this tab you have the posibility to change the admin password.


You can use a NTP Server I recommend use it.


In this part you can create a Support Bundle this is very important when you need resolve issues.


The first step is connect to the VMware vSphere Web Client and then right click to the resource pool where you are going to deploy the VMware vRealize Automation Appliance.  Please look the  next picture.


After that just browse the folder where the ova file resides and click to Next.


Please read the OVF details and click to Next.


Here we need to accept the EULA and the click to Next.


Type the VM name, and select the folder then click to Next.


Select the disk format I recommend Thin Provisioning and then click to Next.


In this part select the Network Adapter the click to Next.


In this part just fill the template requirements such as password, Hostname and Network information. Please look the images below.


In this part don't forget to check the information, and check the Power on after deployment and click to Finish.


Please follow the instructions.


Fill the username and password and click to Next


Check the system information.


Change to your time zone in my case GMT -5


In this part create a certificate or use the auto-signed certifacte. After that just click to Next.


Connect the VMware Identity to vRealize Automation then Save Settings.


Here use your license, after that click in Submit Key.


Thanks for visiting my blog!!!

Share and be sociable!!!


jueves, 13 de agosto de 2015

Web Access for ESXi Host


Esxi Host Web Management


Hi Friends!!!

For this moment I am going to show you, how to enable the web access for an esxi host.


Please refer to this webpage for more details https://labs.vmware.com/flings/esxi-embedded-host-client


After go to host using SSH and use the command like you can see in the Next picture.


After that go to the web browser for my case Google Chrome, and type this page: http://<FQDNorIPyourESXIhost>/UI; after type root and password


And here We can use the web page to manage our esxi host.


Please take note of these requirements & features


 Thanks for visiting my Blog!!!

Share and be social!!

Implementing a VDI Solution


VDI Solution

Hi Friends,

In this part we are going to see the schemas for a VMware View Solution.

In VMware Horizon View we have two solutions: Floating or Dedicated Desktops.

  • Floating Desktops
          This type of desktops give access to the pool of desktops and the user has not a dedicated                     desktop for the environement. The users share the desktop with the others users.


  • Dedicated Desktops
          In this type of desktops we can see the users using their own dekstop, for that the assigment in             the desktop poll give acces user for desktop and the desktop cannot share with other users.


VMware Horizon View Prerrequisites


VMware Horizon View Requirements


The requirements for VMware Horizon View are:

  • VMware View Connection Server Requirements
           Processor: 4 vCPUs
           Network Adapter: 1Gbps NICs
           Memory Windows Server 2008: 10 GB
           Memory Windows Server 2012: 10 GB

           Supported Operating Systems for View Connection Server
     
           Windows Server 2008 R2 - Standard, Enterprise
           Windows Server 2008 R2 SP1 - Standard, Enterprise
           Windows Server 2012 R2 - Standard, Enterprise


  • VMware View Administrator Requirements
           Internet Explorer 8
           Internet Explorer 9
           Internet Explorer 10 (Windows 8 Desktop Mode)
           Firefox 6 and later


  • VMware View Composer Server Requirements
           Processor: 4 vCPUs
           Network Adapter: 1Gbps NICs
           Memory: 8 GB
           

           Supported Operating Systems for View Composer Server
     
           Windows Server 2008 R2 - Standard, Enterprise
           Windows Server 2008 R2 SP1 - Standard, Enterprise
           Windows Server 2012 R2 - Standard, Enterprise


 For Database Requirements: http://partnerweb.vmware.com/comp_guide2/sim/interop_matrix.php


VMware Tools Using VIB

 Hello Guys, In this post I'm going to show you how to apply a VMware Tools VIB to update the version propagated by the ESXi Host. First...