martes, 23 de octubre de 2018

PSC: Installing with CLI


Installing PSC with JSON File

Hello guys in this moment I'm going to share how to install PSC with JSON File:

First Step:

All you need is to mount the iso media file in Windows or Mac and to go to the JSON File Path:

In my case:

D:\vcsa-cli-installer\templates\install

I recommend you to copy the "install folder" in your desktop.

In my case:

C:\Users\vicente.meneses\Desktop\INSTALACIONVCSA\install 

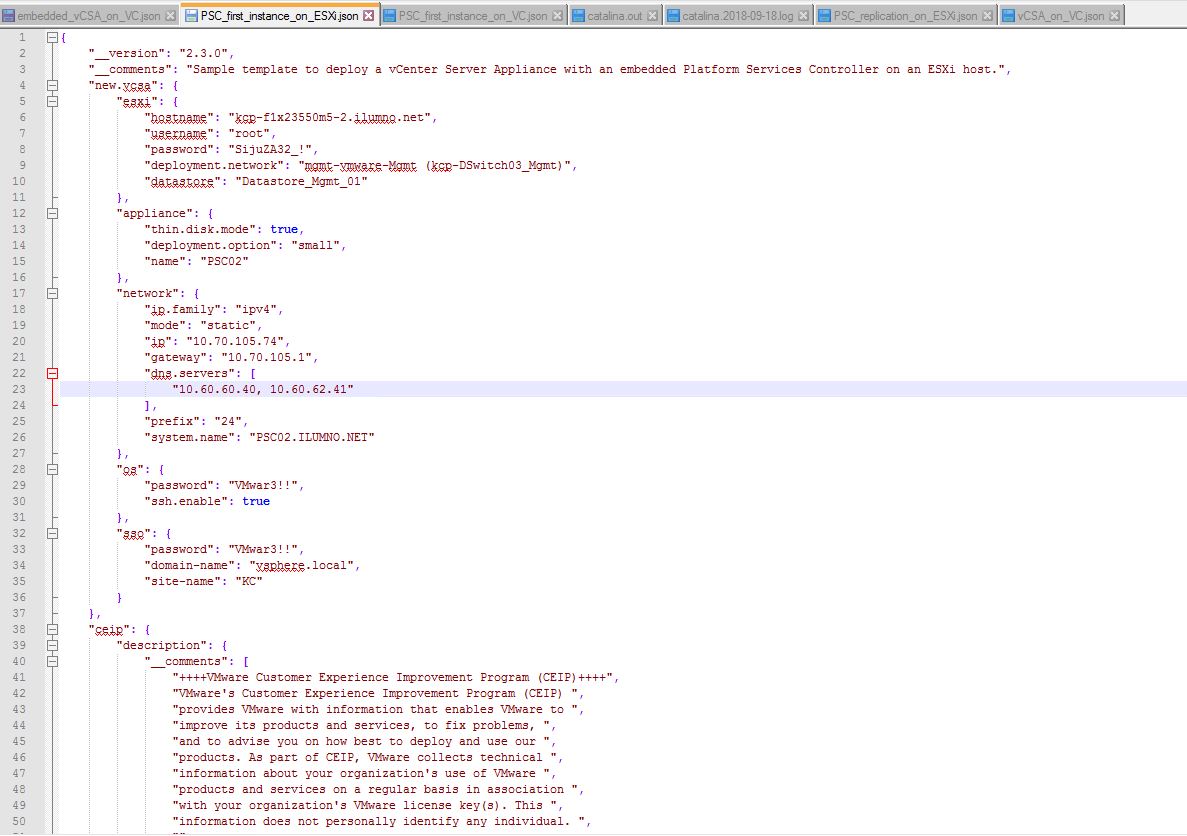
After that, all you need is to edit this file: PSC_first_instance_on_ESXi.json or this file PSC_replication_on_ESXi.json If you have a  previous PSC.


In the next link you can find an example, feel free to use this document:

https://drive.google.com/open?id=1HmqVx499aKqRcxCXT7sJFL6nLF1tJzNI 


So, the Next step is to execute CMD with admin privileges, search cmd in windows menu and press Ctrl + Shift + Enter. Thenyou need to execute the command:

D:\vcsa-cli-installer\win32>vcsa-deploy.exe install --verify-only --no-esx-ssl-verify  C:\Users\vicente.meneses\Desktop\INSTALACIONVCSA\install\PSC_replication_on_ESXi.json

Don't forget the VMware Documentation: https://www.vmware.com/content/dam/digitalmarketing/vmware/en/pdf/techpaper/products/vsphere/vmware-vsphere-60-vcenter-server-appliance-cmdline-install-technical-note.pdf 

The confirmation message is like this:
Basic verification completed successfully.


After that you need to install:

D:\vcsa-cli-installer\win32>vcsa-deploy.exe install --accept-eula --no-esx-ssl-verify C:\Users\vicente.meneses\Desktop\INSTALACIONVCSA\install\PSC_replication_on_ESXi.json


If the deployment was successfully you will see the next screen in your browser:


After that, you need to use putty (in my case) to connect to the virtual appliance and to use the next command to join to  the Windows Domain:

/opt/likewise/bin/domainjoin-cli join ilumno.net user@company.com Passw0rd!


Then check the web interface:

https://YourPSCAddress:5480


Thanks for visiting my blog.
And that is all for today.

Share and be sociable :)


lunes, 22 de octubre de 2018

PowerCLI: Configuration vSphere Folders


CLUSTER CONFIGURATIONS


FOLDER CONFIGURATIONS


PowerCLI C:\>Connect-VIServer -Server 10.60.105.77 -User administrator@vsphere.local -Password Passw0rd!


CREATE VM AND TEMPLATE FOLDER

Get-Folder -NoRecursion | New-Folder -Name MGMT01

DELETE VM AND TEMPLATE FOLDER

Get-Folder -Name MGMT01  | Remove-Folder -Confirm:$false


PowerCLI: Configuration PowerCLI


Configuring PowerCLI


ALARMS:


PowerCLI C:\>Connect-VIServer -Server 10.60.105.77 -User administrator@vsphere.local -Password Passw0rd!

PowerCLI C:\> Get-AlarmDefinition -Name 'Host connection and power state' |Set-AlarmDefinition -Description 'Host Power State'


PowerCLI C:\> Get-AlarmDefinition -Name 'Host connection and power state' |Set-AlarmDefinition -Description 'Host Power State'  -ActionRepeatMinutes 5

PowerCLI C:\> Get-AlarmDefinition -Name 'Host connection and power state' |New-AlarmAction -Email -To 'operaciones@company.com'


PowerCLI C:\> Get-AlarmDefinition -Name 'Host connection and power state' | Get-AlarmAction


NETWORKING:


New dvSwitch:

New-VDSwitch -Name 'VMware_COMPANY

Remove dvSwitch:

Get-VDSwitch -Name 'VMwar3_COMPANY' | Remove-VDSwitch -Name 'VMwar3_COMPANY'

Get-VDSwitch -Name 'VMwar3_COMPANY' | New-VDPortgroup -Name 'VMware_POrtgroup'

Teaming Policy dvportgroup:

Get-VDSwitch "dvsCOMPANY" | Get-VDPortGroup DMZ Virtual IPs | Get-VDUplinkTeamingPolicy | Set-VDUplinkTeamingPolicy -LoadBalancingPolicy LoadBalanceLoadBased


-LoadBalancingPolicy

1.  LoadBalanceIP - Description #Set Route based on IP hash
2.  LoadBalanceSrcMac - Description #Set Route based on source MAC hash
3.  LoadBalanceSrcId - Description #Set Route based on originating virtual port
4.  ExplicitFailover - Description #Set Use explicit failover order
5.  LoadBalanceLoadBased - Description #Set Route based on physcial NIC load
6.  LoadBalanceIP - Description #Remove $pg to apply new load balancing policy to all portgroups on the same VDS


CLUSTER DRS

PowerCLI C:\>Connect-VIServer -Server 10.60.105.77 -User administrator@vsphere.local -Password Passw0rd!


Get-Cluster

DRS Configuration

Get-Cluster C3-MGMT |Set-DrsAutomationLevel Manual

Set-Cluster C3-DEV -DRSAutomationLevel PartiallyAutomated

Set-Cluster C3-DEV -DRSAutomationLevel FullyAutomated

Add Host to Cluster

Get-Cluster C3-MGMT | Add-VMHost 1amp-esxi02.company.net -User root -Password VMwr3!!


Remove Host from Cluster

Get-VMHost covbneswcinrm2002.ilumno.net -Location DC | Remove-VMHost -Confirm:$false


VCSA CLI Installer


VCSA CLI INSTALLER

Hello Guys,

In this post I'm going to show how to install VCSA 6.5 with CLI Installer, In this post I did this installation in Mac and Windows Server 2016 too.  


1.  Configuring the Json File:


  • Where I find de JSON File
          F:\vcsa-cli-installer\templates\install

          In my case I used a Windows Server but you can use Linux or Mac too (I promise in Mac :))


In this Deploymet I'm going to Install VMware vCenter Server and Platform Services Controller:

       
The First Step is configure the PSC_first_instance_on_ESXi file.


Imagen 1: VCSA Json File


So After that you need to excecute the next command (In windows CMD, Terminal on Mac or Linux)

Where I find these commands?

Here: https://www.vmware.com/content/dam/digitalmarketing/vmware/en/pdf/techpaper/products/vsphere/vmware-vsphere-60-vcenter-server-appliance-cmdline-install-technical-note.pdf 

2. Executing the command for the VMware Platform Service Controller


  • Command Options:


  • Command Structure
            Windows:

            Verify the JSON File:
             
           F:\vcsa-cli-installer\win32>vcsa-deploy.exe install --acknowledge-ceip --accept-eula --no-esx-             ssl-verify --verify-only C:\temp\install\PSC_first_instance_on_ESXi.json 

             Result:


            Install PSC

            Windows:

              F:\vcsa-cli-installer\win32>vcsa-deploy.exe install --acknowledge-ceip --accept-eula --no-                    esx-ssl-verify C:\temp\install\PSC_first_instance_on_ESXi.json 


Installing Kubernetes on RHEL 9

  Hello Guys, In this post I will show you how to install a Kubernetes cluster on RHEL8. Let's Start: Disablle Swapp: sudo swapoff -a Co...