s谩bado, 20 de enero de 2024

Installing Kubernetes on RHEL 9


Hello Guys,

In this post I will show you how to install a Kubernetes cluster on RHEL8.


Let's Start:

Disablle Swapp:

sudo swapoff -a

Configure SELINUX:

sudo sed -i 's/^SELINUX=enforcing$/SELINUX=permissive/' /etc/selinux/config


Now we require to load the modules for Kubernetes:


sudo vi /etc/modules-load.d/k8s.conf

overlay

br_netfilter


Enable the modules with the next commands:

sudo modprobe overlay

sudo modprobe br_netfilter


Now the systcl for the Kubernetes services how I show below:


sudo vi /etc/sysctl.d/k8s.conf

net.bridge.bridge-nf-call-iptables  = 1

net.ipv4.ip_forward                 = 1

net.bridge.bridge-nf-call-ip6tables = 1


Load the sysctl into the system:

sudo sysctl --system


export VERSION=1.27


Enable de Repositories to download the Kubernetes software and updates.

sudo curl -L -o /etc/yum.repos.d/devel:kubic:libcontainers:stable.repo https://download.opensuse.org/repositories/devel:/kubic:/libcontainers:/stable/CentOS_8/devel:kubic:libcontainers:stable.repo


sudo curl -L -o /etc/yum.repos.d/devel:kubic:libcontainers:stable:cri-o:$VERSION.repo https://download.opensuse.org/repositories/devel:kubic:libcontainers:stable:cri-o:$VERSION/CentOS_8/devel:kubic:libcontainers:stable:cri-o:$VERSION.repo


Install CRI-O with the next commands.


sudo dnf install cri-o

sudo systemctl enable crio

sudo systemctl start crio

sudo vi /etc/yum.repos.d/kubernetes.repo


[kubernetes] 

name=Kubernetes

baseurl=https://packages.cloud.google.com/yum/repos/kubernetes-el7-x86_64

enabled=1

gpgcheck=1

repo_gpgcheck=1

gpgkey=https://packages.cloud.google.com/yum/doc/yum-key.gpg https://packages.cloud.google.com/yum/doc/rpm-package-key.gpg

exclude=kubelet kubeadm kubectl


Install Kubernetes this include kubelet, kubeadm and kubectl.


sudo dnf install -y kubelet-1.27.0 kubeadm-1.27.0 kubectl-1.27.0 --disableexcludes=kubernetes

sudo systemctl enable kubelet

sudo systemctl start kubelet


Init the Pod Network


sudo kubeadm init --pod-network-cidr=172.31.17.0/24


Your Kubernetes control-plane has initialized successfully!

Follow the next instructions to finish the configuration:


To start using your cluster, you need to run the following as a regular user:


  mkdir -p $HOME/.kube

  sudo cp -i /etc/kubernetes/admin.conf $HOME/.kube/config

  sudo chown $(id -u):$(id -g) $HOME/.kube/config


Alternatively, if you are the root user, you can run:


  export KUBECONFIG=/etc/kubernetes/admin.conf


You should now deploy a pod network to the cluster.

Run "kubectl apply -f [podnetwork].yaml" with one of the options listed at:

https://kubernetes.io/docs/concepts/cluster-administration/addons/


Then you can join any number of worker nodes by running the following on each as root:


 Use the next command to join workers nodes into the controlplane node.


kubeadm join 172.31.14.12:6443 --token qfpwvd.czh92zzofcfsf69a \

        --discovery-token-ca-cert-hash sha256:21555cb1c89a7bc60c30bc76218167608df64b196a7fee5d87de31e9c5728053


jueves, 24 de marzo de 2022

VMware vSphere: Update ESXi Host Using SSH


Hello Guys,


In this post I will show you how to update an ESXi host using SSH.


First Visit this webpage: https://customerconnect.vmware.com/patch and download the path:


Then you must connect to ESXi Host using SSH. (I use putty but You can use terminal for MAC OS or Linux OS)


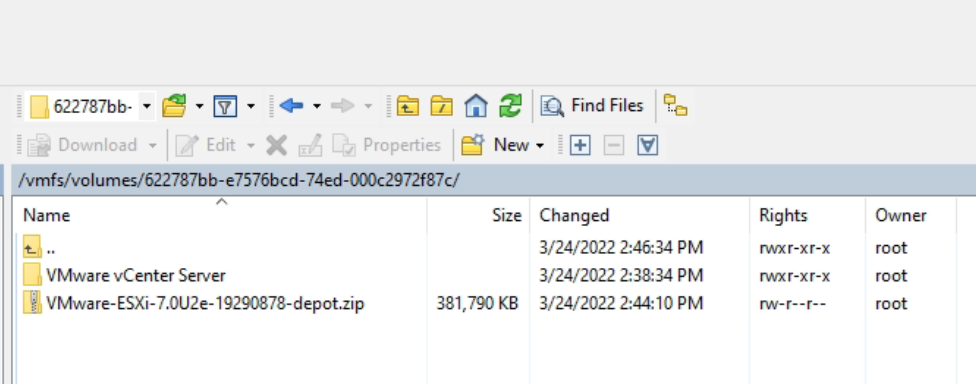
Now you must upload the ESXi depot Zip in a VMFS datastore; you can use a WinSCP (or similar) connection to the ESXi host or datastore explorer by use of the VMware vSphere Client


Uploading the file...... wait......


When the upload is finished....


Find the file in the SSH client


Now we need to apply the patch as follows:

Get the ESXi profile with the command:

esxcli software sources profile list -d /vmfs/volumes/datastore1/VMware-ESXi-7.0U2e-19290878-depot.zip


Then apply the patch with this command:

esxcli software profile update -d /vmfs/volumes/datastore1/VMware-ESXi-7.0U2e-19290878-depot.z
ip -p ESXi-7.0U2e-19290878-no-tools


Then it is important to apply a reboot (depends of the path - the result of command applied above show the reboot requirement).

Reboot using this command:

reboot -f  (don't forget the maintenance mode)


That's all guys.

Thanks for visiting my blog.

Don't forget Give me a Coffee

Share and be sociable. 馃挌


martes, 14 de septiembre de 2021

Configuring ESXi for SNMPv3


Hello Guys,


In this post I will show you how to configure and enable SNMPv3 traps in VMware vSphere 6.7 or later.


First Step:  Get the MAC Address on ESXi Host:

Command:

esxcfg-info | grep "Mac Address"

Result:

LoadOemStrings: SMBIOS OEM String at 5 failed: Unable to get node: Sysinfo error: FailureSee VMkernel log for details.
               |----Mac Address.....................................00:25:b5:22:a1:02
               |----Mac Address.....................................00:50:56:67:32:7c
               |----Mac Address.....................................00:50:56:6c:63:c8
                  |----Mac Address..................................00:25:b5:22:a1:02
                  |----Mac Address..................................00:50:56:67:32:7c
                  |----Mac Address..................................00:50:56:6c:63:c8
            |----World Command Line.................................grep Mac Address


Second Step:  With the MAC Address configure the Engine ID:

esxcli system snmp set -E=25b522a102

Third Step:  Set the authentication protocol:

esxcli system snmp set -a=MD5

Four Step:  Set the encryption protocol:

esxcli system snmp set -x=AES128

Fifth Step:  Indicate the authentication and encryption password:

Command:

esxcli system snmp hash -r -A SnMpV3BnClDx -X SnMpV3BnClDx

Result:

   Authhash: 09851d1332df44bf48e73e5112a60c7b
   Privhash: 09851d1332df44bf48e73e5112a60c7b

Sixth Step:  Indicate the user with the Authhash and Privhash:

esxcli system snmp set --users SNMPV3HYPFLEX/09851d1332df44bf48e73e5112a60c7b/09851d1332df44bf48e73e5112a60c7b/priv

Seventh Step: Enable SNMP

esxcli system snmp set --enable true

eighth Step: Enable SNMPv3

esxcli system snmp set --v3targets 172.27.254.72@161/SNMPV3HYPFLEX/priv/trap 

That's all for this post.

Rememeber: Share and be sociable.


lunes, 29 de junio de 2020

Visual ESXTOP


Hello Guys,

In this post I will to show you how to use Visual ESXtop.

Visual esxtop is a VMware Fling tool and this tool is very interesting because with that tool we can visualize the command esxtop in a vmware vsphere.

In the next link you could download the tool:

https://flings.vmware.com/visualesxtop

Requirements:

Java (Lastest version)

How to use?

It's very easy to use a VMware Flings and this is my experience with this tool:

1.  Download the tool


2. Extract the zip file:

In my case I use 7 zip but all the OS include a unzipped tool:


3.  Then if you are using Windows you can use .bat file and if you are using Linux you can use .sh:


In my case I am using Windows and the execution is as follows:


After the execution of the command above is possible to see the next window:


And you need to connect to esxi host as follows:


Fill the information of the esxi host:


In the pictures is possible to validate the information:


I recommend read the next information to next article to get a best undestanding of this tool:

https://communities.vmware.com/docs/DOC-9279

Best regards,

Share and be sociable.

Follow me on twitter: @vicentejr86


Installing Kubernetes on RHEL 9

  Hello Guys, In this post I will show you how to install a Kubernetes cluster on RHEL8. Let's Start: Disablle Swapp: sudo swapoff -a Co...