viernes, 7 de diciembre de 2018

Installing vCenter Server 6.7


Installing vCenter Server 6.7

Hello Guys!!

In this post I'm going to show how to deploy vCenter Server Apliance 6.7.

After that, you need to execute "Install" in the installation screen.


Then click to Next.


In this step you need to accept the EULA and then click to Next.


In this part select vCenter Server with an Embedded Platform Services Controller (Please consider read this doc: https://docs.vmware.com/en/VMware-vSphere/6.7/com.vmware.vcenter.install.doc/GUID-A71D7F56-6F47-43AB-9C4E-BAA89310F295.html)


 In this part fill in with "Esxi host" to install the new vCenter Server.


Then complete the information for the appliance VM and click to Next.


Consider the size of your virtual infrastructure to define the size of the vCenter Server.


In this part select the VMware vSphere Datastore, I recommend to enable the thin provisioning.


In this part fill in the Network settings and then click to Next.


Take the time to read the Confirmation Page and then click to Finish.


In this part click to Continue. (Consider to grab a coffee, this part takes time :)).


In this part click to Next for the Stage 2.


In this part configure the NTP Server and the enable SSH.


After that, configure the vsphere.local domain and the password for the administrator user.


You need to consider if you want to send traps to VMware, please read the information.


Check the Ready to Complete and then Click to Finish.


And the result is success :)


And then check the access:

Thanks for visiting my blog.

Share and be sociable!!

Please follow me on twitter @vicentejr86 

lunes, 3 de diciembre de 2018

PowerCLI: HotAdd: CPU & MEMORY


CPU AND MEMORY: HOT ADD

Hello Guys,

In this post I'm going to show how to get the feature Hot Add in which one virtual machines is enable true:

First you need to connect to the VMware vCenter Server:

$server1=Connect-VIServer -Server 10.60.105.77 -User administrator@vsphere.local -Password VMwar3!! 

After that you need to execute the next command:

Get-Datacenter | Get-VM | Select Name,  @{N="CpuHotAddEnabled";E={$_.ExtensionData.Config.CpuHotAddEnabled}},  @{N="MemoryHotAddEnabled";E={$_.ExtensionData.Config.MemoryHotAddEnabled}} 

Result:


But if you need to save the report in your computer, use the next command:


Get-Datacenter | Get-VM | Select Name,  @{N="CpuHotAddEnabled";E={$_.ExtensionData.Config.CpuHotAddEnabled}},  @{N="MemoryHotAddEnabled";E={$_.ExtensionData.Config.MemoryHotAddEnabled}} |Export-csv /Users/vicentemeneses/Desktop/HotaddNAP.csv -NoTypeInformation -UseCulture 


Result:


Thanks for visiting my Blog.

Share and be sociable!!!


martes, 23 de octubre de 2018

PSC: Installing with CLI


Installing PSC with JSON File

Hello guys in this moment I'm going to share how to install PSC with JSON File:

First Step:

All you need is to mount the iso media file in Windows or Mac and to go to the JSON File Path:

In my case:

D:\vcsa-cli-installer\templates\install

I recommend you to copy the "install folder" in your desktop.

In my case:

C:\Users\vicente.meneses\Desktop\INSTALACIONVCSA\install 

After that, all you need is to edit this file: PSC_first_instance_on_ESXi.json or this file PSC_replication_on_ESXi.json If you have a  previous PSC.


In the next link you can find an example, feel free to use this document:

https://drive.google.com/open?id=1HmqVx499aKqRcxCXT7sJFL6nLF1tJzNI 


So, the Next step is to execute CMD with admin privileges, search cmd in windows menu and press Ctrl + Shift + Enter. Then, you need to execute the command:

D:\vcsa-cli-installer\win32>vcsa-deploy.exe install --verify-only --no-esx-ssl-verify  C:\Users\vicente.meneses\Desktop\INSTALACIONVCSA\install\PSC_replication_on_ESXi.json

Don't forget the VMware Documentation: https://www.vmware.com/content/dam/digitalmarketing/vmware/en/pdf/techpaper/products/vsphere/vmware-vsphere-60-vcenter-server-appliance-cmdline-install-technical-note.pdf 

The confirmation message is like this:
Basic verification completed successfully.


After that you need to install:

D:\vcsa-cli-installer\win32>vcsa-deploy.exe install --accept-eula --no-esx-ssl-verify C:\Users\vicente.meneses\Desktop\INSTALACIONVCSA\install\PSC_replication_on_ESXi.json


If the deployment was successfully you will see the next screen in your browser:


After that, you need to use putty (in my case) to connect to the virtual appliance and to use the next command to join to  the Windows Domain:

/opt/likewise/bin/domainjoin-cli join ilumno.net user@company.com Passw0rd!


Then check the web interface:

https://YourPSCAddress:5480


Thanks for visiting my blog.
And that is all for today.

Share and be sociable :)


lunes, 22 de octubre de 2018

PowerCLI: Configuration vSphere Folders


CLUSTER CONFIGURATIONS


FOLDER CONFIGURATIONS


PowerCLI C:\>Connect-VIServer -Server 10.60.105.77 -User administrator@vsphere.local -Password Passw0rd!


CREATE VM AND TEMPLATE FOLDER

Get-Folder -NoRecursion | New-Folder -Name MGMT01

DELETE VM AND TEMPLATE FOLDER

Get-Folder -Name MGMT01  | Remove-Folder -Confirm:$false


PowerCLI: Configuration PowerCLI


Configuring PowerCLI


ALARMS:


PowerCLI C:\>Connect-VIServer -Server 10.60.105.77 -User administrator@vsphere.local -Password Passw0rd!

PowerCLI C:\> Get-AlarmDefinition -Name 'Host connection and power state' |Set-AlarmDefinition -Description 'Host Power State'


PowerCLI C:\> Get-AlarmDefinition -Name 'Host connection and power state' |Set-AlarmDefinition -Description 'Host Power State'  -ActionRepeatMinutes 5

PowerCLI C:\> Get-AlarmDefinition -Name 'Host connection and power state' |New-AlarmAction -Email -To 'operaciones@company.com'


PowerCLI C:\> Get-AlarmDefinition -Name 'Host connection and power state' | Get-AlarmAction


NETWORKING:


New dvSwitch:

New-VDSwitch -Name 'VMware_COMPANY

Remove dvSwitch:

Get-VDSwitch -Name 'VMwar3_COMPANY' | Remove-VDSwitch -Name 'VMwar3_COMPANY'

Get-VDSwitch -Name 'VMwar3_COMPANY' | New-VDPortgroup -Name 'VMware_POrtgroup'

Teaming Policy dvportgroup:

Get-VDSwitch "dvsCOMPANY" | Get-VDPortGroup DMZ Virtual IPs | Get-VDUplinkTeamingPolicy | Set-VDUplinkTeamingPolicy -LoadBalancingPolicy LoadBalanceLoadBased


-LoadBalancingPolicy

1.  LoadBalanceIP - Description #Set Route based on IP hash
2.  LoadBalanceSrcMac - Description #Set Route based on source MAC hash
3.  LoadBalanceSrcId - Description #Set Route based on originating virtual port
4.  ExplicitFailover - Description #Set Use explicit failover order
5.  LoadBalanceLoadBased - Description #Set Route based on physcial NIC load
6.  LoadBalanceIP - Description #Remove $pg to apply new load balancing policy to all portgroups on the same VDS


CLUSTER DRS

PowerCLI C:\>Connect-VIServer -Server 10.60.105.77 -User administrator@vsphere.local -Password Passw0rd!


Get-Cluster

DRS Configuration

Get-Cluster C3-MGMT |Set-DrsAutomationLevel Manual

Set-Cluster C3-DEV -DRSAutomationLevel PartiallyAutomated

Set-Cluster C3-DEV -DRSAutomationLevel FullyAutomated

Add Host to Cluster

Get-Cluster C3-MGMT | Add-VMHost 1amp-esxi02.company.net -User root -Password VMwr3!!


Remove Host from Cluster

Get-VMHost covbneswcinrm2002.ilumno.net -Location DC | Remove-VMHost -Confirm:$false


VCSA CLI Installer


VCSA CLI INSTALLER

Hello Guys,

In this post I'm going to show how to install VCSA 6.5 with CLI Installer, In this post I did this installation in Mac and Windows Server 2016 too.  


1.  Configuring the Json File:


  • Where I find de JSON File
          F:\vcsa-cli-installer\templates\install

          In my case I used a Windows Server but you can use Linux or Mac too (I promise in Mac :))


In this Deploymet I'm going to Install VMware vCenter Server and Platform Services Controller:

       
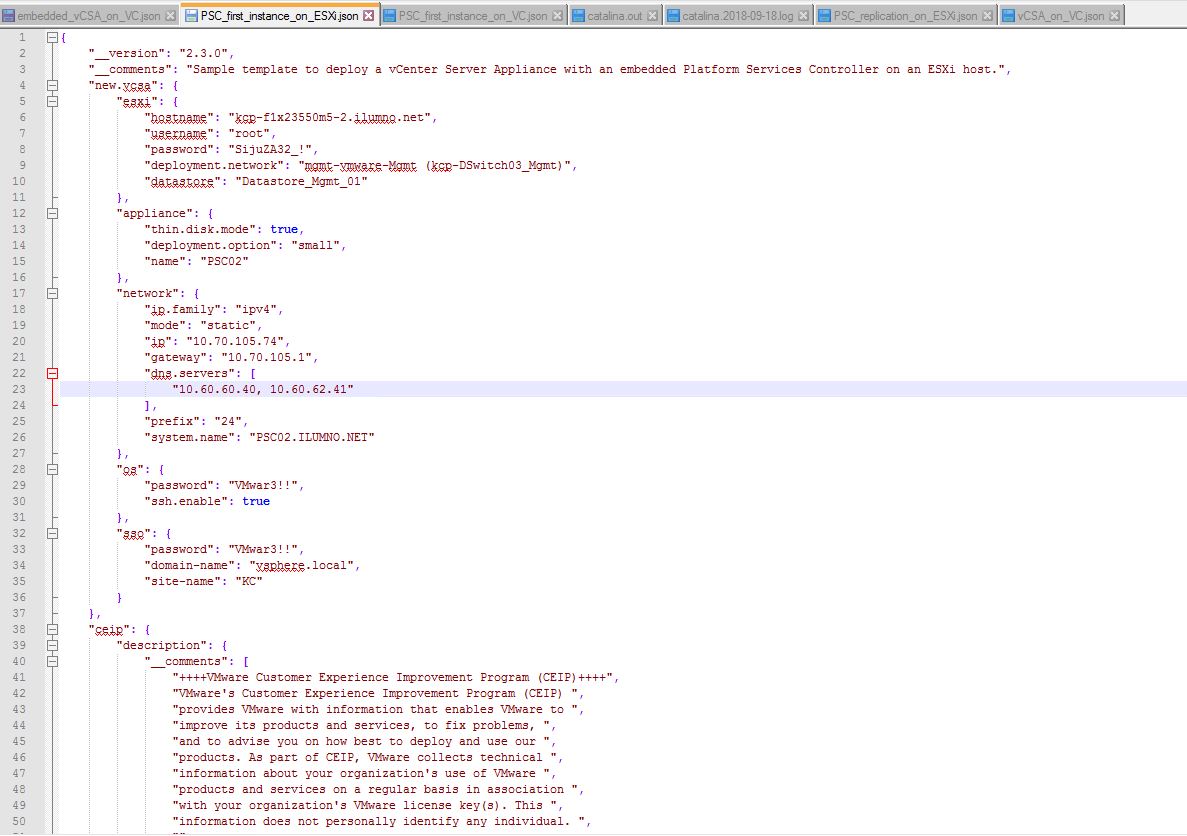
The First Step is configure the PSC_first_instance_on_ESXi file.


Imagen 1: VCSA Json File


So After that you need to excecute the next command (In windows CMD, Terminal on Mac or Linux)

Where I find these commands?

Here: https://www.vmware.com/content/dam/digitalmarketing/vmware/en/pdf/techpaper/products/vsphere/vmware-vsphere-60-vcenter-server-appliance-cmdline-install-technical-note.pdf 

2. Executing the command for the VMware Platform Service Controller


  • Command Options:


  • Command Structure
            Windows:

            Verify the JSON File:
             
           F:\vcsa-cli-installer\win32>vcsa-deploy.exe install --acknowledge-ceip --accept-eula --no-esx-             ssl-verify --verify-only C:\temp\install\PSC_first_instance_on_ESXi.json 

             Result:


            Install PSC

            Windows:

              F:\vcsa-cli-installer\win32>vcsa-deploy.exe install --acknowledge-ceip --accept-eula --no-                    esx-ssl-verify C:\temp\install\PSC_first_instance_on_ESXi.json 


martes, 18 de julio de 2017

Getting Host Id


How to get the Host ID?

Hello Guys!!

In this post I'm going to show you how to get the Host ID.

Using PowerCLI


Using hostlist


Thanks for visiting my Blog!!!

Share and be sociable!!

VMware Tools Using VIB

 Hello Guys, In this post I'm going to show you how to apply a VMware Tools VIB to update the version propagated by the ESXi Host. First...